Friday, May 29, 2015

Doctor Who Christmas cross stitch

Who doesn't like a touch of Christmas during these boiling days of almost-summer?  I know that I start prepping for Christmas as far in advance as possible, since so much of my decor and many of my gifts are handmade.  Also, I just adore Christmas.  Since I can't do much pattern editing, testing, or sharing right now thanks to my computer going on strike, I thought I would share a Doctor Who Christmas cross stitch project I recently completed.

Here it is, all framed up:

Doctor Who Christmas cross stitch
Doctor Who Christmas cross stitch.  You can create your own pattern with just a few simple steps!

My apologies for the pictures; I didn't take them before it was framed, so it was exceptionally hard to get a shot without showing you my entire living room in the reflection.  :)

There's no pattern for this one, because it's not my own design.  I can't even honestly remember where I found the source image for this one.  I'm really just sharing this as a geek sewing tip so you can learn how to make your own.

To make it, I found a t-shirt or sweatshirt pattern I liked and printed it out so I could work on it away from the computer.  There are tons of nerdy Christmas shirt patterns out there that you could easily convert to cross stitch, like this one.  You will find this to be much easier if the image appears to be made of v-shaped knitting stitches.  If you find one you like that is not already in stitches for you, you can use a cross stitch conversion program (like Pic 2 Pat) to create a pattern from the picture you found.  However, I discovered that did not work well for this particular project, so use it at your own risk.

I then printed up some free cross stitch pattern papers, taped them together, and carefully went through the original picture section by section, counting each v-shaped "stitch" on the sweater as a square on the paper, and coloring the paper to match.  You could use symbols as well, but if the pattern has few enough colors, it makes it easier to stitch it out if you just use colored pencils and color in each block.  I stitched mine on navy blue Aida cloth so the colors would pop.

Doctor Who Christmas cross stitch
I love how it turned out!

Almost the entire thing is simple cross stitch, with no half or quarter stitches, no French knots, and minimal backstitching.  I only added backstitching to some of the snowflake shapes and in the center of the bowtie to help give it shape.  The pattern lent itself to this simplified cross stitch really well.  However, I wanted to include the Christmas lights that wrapped around the TARDIS in the original image, so I backstitched a green cord and added tight lazy daisies in red for the lightbulbs.

Doctor Who Christmas cross stitch
The TARDIS centerpiece.

I'm looking forward to displaying this at the holidays.  There are always little geeky items and crafts tucked away around our house, and Christmas should be no exception.

I also recently finished a Hobbit-themed cross stitch for our dining room at the new house, and I'm really pleased with it.  I'll share that one -- with links to the pattern -- as soon as I have it framed up.

Thursday, May 28, 2015

Throne Thursday: Baelish

So there's bad news, and there's good news.

The bad news is, my computer is currently sporting the blue screen of death.  It's like the cherry on top of the sundae of suckage this week.  I've narrowed it down to an issue with the battery or the fan, so replacements are on the way.  In the meantime, I'm working on the kids' computer, which requires installing all of the programs I need to share my patterns.  It's funny how nothing will remind you that you never back up your files quite like your computer breaking down.

The good news is, I had just emailed the Game of Thrones pattern pack to a tester, so I was able to pull it up on this computer from my email.  Today's pattern is the Baelish sigil.

Game of Thrones quilt
The computer-generated image.

This pattern is incredibly simple to piece.  I would probably rate it at a 2/5, only because I think a 1/5 should be a true beginner pattern, preferably with few to no sections to put together.  But you can stitch this one up really fast, and the pattern is really versatile and doesn't have to be related to Game of Thrones.

Game of Thrones quilt
The real deal.

I'm not actually happy with the color combination.  I thought I would try it out since this was the only green and grey I had that wasn't heavily floral, but I'm pretty sure I'm going to redo this block after a quick trip to the fabric store.  At least it is tested and ready to go!

Game of Thrones quilt
The Baelish sigil.

Then again, I think I love that green.  It's just that polka dot silver that needs to go.  I'd love to find a nice tonal to replace it with.

Since my Martell block got such a crummy picture last week, I thought I would try to get a better one to show it off.  It didn't work out too well, but here it is, in some of its glory:

Game of Thrones quilt
Martell block.

I've decided that because the quilt will naturally be so colorful, I'm going to reuse a lot of my fabrics throughout the different blocks.  When I find a grey I like, it will be the Baelish bird, the Tully trout, and the Arryn eagle.  That same red from the Martell block will be showing up as the Targaryen dragon and the background of the Lannister sigil.  I'm hoping that will lend some consistency and connection to the quilt.

Game of Thrones quilt
My progress so far!  They are colorful, but I think they will all work out together.

Right now you can download the pattern here, but it won't be available on Craftsy until my other computer is up and running.  I will update the posting as soon as I have it listed there.

Side note:  I just came across this Ministry of Magic pattern by liljabs.  It looks simple and fun, and I have a feeling I may take a breather from my PoD and GoT and knock this one out this weekend.  Head on over and check it out!

Wednesday, May 27, 2015

Harry Potter Project of Doom "Quilt-Behind": Week 3

This week I knocked out a couple of the more difficult Project of Doom patterns that are available at this point:  the Deathly Hallows and the Dark Mark.  I am pretty pleased with how they turned out, and I'm glad I included them both in this block.  I am loving all the variations that Jennifer is including for us!  Right now, looking at what I have finished, I'm wondering if I made the right decision to go with a neutral background for my bookshelf.  I'm hoping that by the time I add in all the extras that aren't on here yet and do some quilting, it will look better.  I think having the wooden shelves and the busy wallpaper around it will help, but right now it looks so ... plain.

Project of Doom
Some of my progress so far.

The Deathly Hallows was much easier than I thought before I saw the pattern.  It's only two sections that piece together easily, so as long as you can sew on the lines, you can make this one!

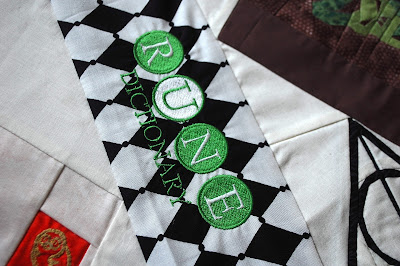
I had embroidered the rune dictionary last week in the hopes of finding the perfect place for it on my bookshelf, so I wanted to feature it here.  I didn't follow the original colors because I needed something that would stand out against this fun black and white fabric.  I wasn't sure it would work out on this pattern, but I think it does, especially in person.  Once again, this fabulous embroidery pattern comes from Susan over at The Bored Zombie.  She just released a new set of embroidery titles, and you don't want to miss out on them.  I'm looking forward to stitching them up next week, after I finish the yearly spell books.

Project of Doom
Rune dictionary.

It absolutely kills me that the book doesn't quite touch the top of the Deathly Hallows, but I'm going to put on my big quilter panties and suck it up.  (Until I decide to go back and rip it out and fix it, of course.)  I decided I wanted the journal to look leather-esque as well as allow the green of the Dark mark to stand out, so I went with some browns for that part of the pattern.

Project of Doom
The Dark Mark pattern.

The Dark Mark.  I thought it would be a lot more difficult than it was.  It was just a lot of tiny pieces and lots of sections that had to match up, but if you're familiar with my work, I don't shy away from tiny pieces.  It didn't end up perfect, but there's nothing that stands out and really bothers me, so I'm chalking this one up as a win.

On a side note, I am crazy excited about the pattern that was released this week and I just happen to have the perfect fabrics for it, so I will probably end up skipping around a bit.  I'm not holding myself to a strict schedule for this project, which is unusual for me.  We're going to test out this whole "spontaneity" thing that my husband keeps talking up and see how it works out.  :)

Where are you at in your PoD?  Just starting out, keeping up, or ahead of the game?

Thursday, May 21, 2015

Throne Thursdays: Martell

Hey, it's still technically Thursday!  That means I can rest easy in the knowledge that I squeaked in under my personally imposed deadline.  We might actually get this quilt finished by Christmas!  Today's installment of my Game of Thrones quilt is the Martell sigil.

We were out tonight enjoying our eldest daughter's performance in her school talent show and having celebratory ice cream afterwards, so I started working on this block late this evening.  That would explain the one terrible picture, but it's documented so we'll call it good.  This was a really easy pattern to draft, which made it kind of fun to stitch up as well.

Game of Thrones quilt
Computer-generated image.

I would rate the difficulty at about a 2/5.  Very few sections that are easy to piece, and there are only a couple spots where points need to line up.  Here's the finished product:

Game of Thrones quilt
The real deal!

In real life, the colors are a lot more vibrant than this.  I tried to avoid getting garish colors so it didn't end up looking like McDonalds threw up on the quilt, and I love the three colors I found.  They are all tonals, and the orange is a beautiful burnt orange.  I think it will look great in the final product.

You can find the pattern here and on Craftsy.


Sunday, May 17, 2015

Baymax gift wrap

Not much to report in the sewing arena this weekend, since our family is battling a stomach virus and Mom, as the only one not ill, has been playing nursemaid to the rest of the family.  However, I just wrapped up a few gifts for some events, and thought I would share a quick Baymax gift wrap idea.


Our family is, of course, obsessed with Big Hero 6.  I'd like to blame it all on the kids, but it is a cute movie and I haven't exactly discouraged marathoning it in my presence.

We've been doing some Baymax-themed things around the house lately.  My eldest daughter made her own Perler bead pattern that turned out really cute, both girls have squandered their allowances and ordered their Baymax Tsum Tsums (am I the only parent out there who has never heard of those?!), and even my little guy, when he's sick, has been requesting Baymax.  It breaks my heart that I can't offer him one to help him feel better.

So when I needed gift wrap for an upcoming birthday party for a Big Hero 6 fan and I couldn't find themed wrapping paper, I thought it couldn't be too difficult to make something, since Baymax is so simple.  I didn't take many pictures because I wasn't planning on sharing, but as you can see, it's pretty self-explanatory.

Baymax gift wrap
Our Baymax gifts.

All I did was buy a 96-cent white tablecloth (the store didn't carry any white wrapping paper or white gift bags), which was enough to wrap many more gifts than this, even after doubling it so you couldn't see right through it.  I wrapped it in the white and used white curling ribbon to match.  I then used my 1 1/4-inch circle punch to punch circles out of my black chalkboard contact paper that I keep on hands for a million strange projects.  A tiny strip of the contact paper connects the eyes.  You could easily hand-cut them out of paper and glue them on, but I'm lazy.  ;)

I love how they turned out.  As a little extra, we made a personalized key chain as a gift tag.

Baymax keychain
Baymax keychain
Pikachu necklace
Pikachu necklace
And then, of course, I was informed at the last minute that it was actually a dual birthday party for a brother and sister.  This is why I keep a gift tote in my closet that I fill up with random toys and gifts at mega clearance sales.  My daughter dug through and found an Angry Birds board game, and we made her a personalized Pikachu necklace.  If you keep the supplies for these necklaces on hand, you can whip one up in about five minutes, and they're always a hit with the kids.  The kids who especially love them are the ones with unusual names, since they don't get a lot of personalized items.

I hope this gives you some ideas for your upcoming Big Hero 6 event!

Thursday, May 14, 2015

Throne Thursdays: Stark

Let me preface this by saying something that will probably horrify any hardcore Game of Thrones fans out there:  I have never read the books, and I've only seen pieces of the show in passing.  Usually as I'm passing through the living room on my way to the sewing room.

However, my husband is the consummate fan.  He is quite miffed that it is suddenly so popular, because he received endless taunting for reading it in high school.  Every year his not-so-surprise birthday gift is the previous season of GoT on DVD, since we don't have HBO, and he sits and binge-watches it as soon as he opens it.

For Christmas this year, I decided to design him a Game of Thrones quilt.  I have a (60-page long!) quilt pattern pack, with 11 sigils of the various Houses and an embroidery pattern for the logo.  The patterns are not in color, as my patterns usually are, because they are primarily two-color designs and it wasn't really necessary.  If you're interested in testing these along with me, I can send you the pack; just let me know!  I will release the individual patterns weekly as I test them, and the entire pack at the end.

This is what the final quilt will look like:

Game of Thrones quilt
Game of Thrones quilt layout.

This is what this block is supposed to look like:

Game of Thrones quilt
Computer-generated image

And this is mine:

Game of Thrones quilt
The real deal:  House Stark sigil
I can't believe I managed to get all the spots that needed to match up to do so ... without any seam ripping!  It's a sewing miracle.

I would probably rate this block about a 2.5/5 for difficulty.  There are only a few sections, and they go together quite easily, with no funny angles.  The sections are easy to stitch, mostly in a back and forth triangular pattern, and there are no tiny pieces.  The block is 10", so it is large enough for even a novice to attempt.

Game of Thrones quilt
These little daisies look like snowflakes.

I chose this white fabric from my stash because I have very little white, and the little daisies on this one reminded me of snowflakes.  I was horrified when I got to the end of this pattern and realized I was short two small pieces of white, and our local JoAnn didn't have any more.  I even tried looking all over the Internet to purchase more, to no avail.  Then I had a light bulb moment, and I thought I would ask the Doomers over on the Project of Doom Facebook page if anyone had any that I could trade for.  Within five minutes, I had several offers of help, and a lovely lady named Linda sent me plenty of the fabric so I could finish up the block without starting over.  Thank you, Linda!

Game of Thrones quilt
Direwolf

I really couldn't be more pleased with how this one turned out.  Hopefully the other ones go together this easily.  (I am dreading the Targaryen sigil.)  I'm going to use the quilt-as-you-go approach for the first time on this quilt, so I'll report back with my progress!  I would love to see your work if you use any of these patterns.

You can find the pattern here and on Craftsy.  Enjoy!

Wednesday, May 13, 2015

Harry Potter Project of Doom "Quilt-Behind": Week 1 and 2

Long time, no blogging!

This house has been pretty much craft-free for the last six months except a few small gifts, as we were preparing for a move to Europe.  Sadly, that has now changed to a move to South Carolina.  Dealing with all that and not taking time for sewing made for one stressed out mom!  I decided I needed to remedy that, and started blocking out some crafting time in my calendar.  It sounds really counter-intuitive to schedule quilting time like a task, but making time for my hobbies makes me so much more productive.  I'm working on my husband's Game of Thrones quilt (first block should be released tomorrow), some cross stitch projects, and several other small projects that I hope to share soon.

The incredible Jennifer Ofenstein is hosting an updated Project of Doom over at Fandom in Stitches.  It is based off her original Harry Potter bookcase quilt, but with lots of changes and lots of room for customization.  I'm looking forward to making a real showpiece for our wall.  One should always display one's unabashed geekery proudly.

Project of Doom Harry Potter Quilt
This week's progress!  Block 1 and 2.  I'm not sure why it looks so wrinkly here; it looks fine in person.  It's like the camera adds ten wrinkles to fabric.

Personally, I am calling this a "quilt-behind" instead of a "quilt-along," because obviously I am working a hair behind the curve.  I am trying not to stress over that, and I'm enjoying seeing what everyone else is doing and borrowing stealing some of their ideas (with so much appreciation!).  ;)

The last time I did the PoD, it was 2011 and it was my first foray into paper piecing.  I had maybe three fat quarter bundles from Wal*Mart, and a bunch of my mom's rejected fabric, and I was just learning to sew on my machine.  It turned out pretty good for a first-timer, but I'm glad to have the chance to redo it now with a few more skills.  I am using a combination of Jennifer's original patterns, ideas from other "Doomers" on the Facebook group, and a few of my own patterns.

Week 1's block included an updated version of the crystal ball.  I loved this version, because it is so much more round than the original.  I used a sparkly white background fabric and appliqued a dog(ish) shape in black to the center to represent the Grim, then covered it with organza.  It's hard to see it in pictures, but it's nice and shimmery.  I think I may applique some swirls over the glass ball when I go to quilt this.

Project of Doom Harry Potter Quilt
The Grim.

I also gave my mother-in-law's Brother PE-700II a good workout today.  (I am going to miss that machine when I have to return it!)  Susan over at The Bored Zombie was nice enough to share her embroidery files for her titles, and I've made several of them already.  Be sure to stop by her blog and check out her amazing progress on her Harry Potter quilt, as well as her other geeky crafts.  She is the master of trying new techniques, and she does a fantastic job sharing her successes and failures with her readers.  The Unfogging the Future embroidery file came from her.

Project of Doom Harry Potter Quilt

Project of Doom Harry Potter Quilt
Unfogging the Future.

I am thinking I might use some bleach to create a color difference or swirls in the crystal ball/moon, but I haven't made up my mind there.  I had to have an envelope for my acceptance letter, personalized with my name.  I am actually thinking that I will make a pocket on the envelope and include a printed fabric acceptance letter, but I'm going to have to practice pockets on something less important to me first, as I haven't done them very often.

Project of Doom Harry Potter Quilt
Acceptance letter, complete with owl stamp!

The little owl embroidery made a perfect stamp for the letter.  I found it in the files section of the Project of Doom Facebook group.  To the best of my knowledge, it must have been Kirsten McGrath who created it as that was the last person to update it, but if I'm wrong about that, please let me know and I'll correct it!

Project of Doom Harry Potter Quilt
Close-up of the owl stamp.

Project of Doom Harry Potter Quilt
I knew I wanted him somewhere; he's just too darn cute!

This Hoffman "Birds and Blossoms" print in purple was part of a trade for some jellybean fabric.  I don't remember who I received it from, but it fits my personality perfectly and I wanted to use it right away.  I also have some of this in turquoise showing up soon.  Might have to run a giveaway for some book spine strips of it!

Project of Doom Harry Potter Quilt
My favorite fabric so far!

I am really happy with my progress this week, and I am starting on Week 3 this weekend.  The Dark Mark and Deathly Hallows in one week; that's a lot to handle!  Let me know where you're at in your Project of Doom this week in the comments.  :D