Showing posts with label shop pattern. Show all posts

Friday, September 23, 2016

12 Days of Christmas Block of the Week Quilt-Along: Block 4

I'm just popping in to let you know that the fourth block in the 12 Days of Christmas quilt-along, the calling bird, has been released on Craftsy!

Are you aware that there are only 92 days left until Christmas?  I'm in full-on crafter's panic mode myself, but it's a happy sort of panic.  Testing out these blocks has put me back in my crafting space on at least a weekly basis and has been a bit of a calming experience, so I am grateful for that.

At long last, here he is!

Computer-generated image.

This is another incredibly versatile block.  It would make a cute spring mug rug or frame up well as a piece of wall art.  I love what a fat, cheeky little bird he is.  it's a bright, fun pattern.

The real deal.  I love his feathery fabric.

It stitched up quickly and easily, and is a good pattern to start with if you're intimidated by some of the earlier blocks.

You can find the pattern here for 2$.

Next week will be another easy stitching week, so it's a great chance to catch up if you have fallen behind.  The hardest part for me was selecting the right yellow colors for my gold ring, and I may even go back and make some changes there.

Happy Christmas crafting!

Friday, September 16, 2016

12 Days of Christmas Block of the Week Quilt-Along: Block 3

It's another exciting Friday for me, because I launched the third block of my 12 Days of Christmas quilt today.

It's no surprise what it is, of course: the French hen.  This block is really versatile, especially for those of you who keep chickens or have a country theme in your house.  I can see this being featured in a really cute quilt or table runner.

The computer-generated image.

You can purchase the block for 2$ on Craftsy here.

I rated this a 4/5 for difficulty, but it all depends on what you consider difficult.  There are lots of sections, so if you have a hard time getting sections to line up, this is hard.  You might leave the excess on each piece and then square it up at the end to ensure you end up with a 9" finished block.  There are also three pieces in the face that are rather small.  They are totally doable, but you have to have patience and good eyesight.  You could leave the small black pupil out and use fabric pens or embroidery to add that in if it's easier for you.  There are not a lot of wacky angles and about half the pieces are pretty simple, so if you have a good amount of experience with paper piecing, this will stitch up fast.  It took me about two hours from start to finish.  The next two blocks are much easier and will give you a chance to breathe a bit more.

The real deal.

I hit the big Jo-Ann sale when they had fat quarters sale and a coupon that could stack with sales, so my girls and I took home an armload of fat quarters each for about 50 cents apiece.  I knew I was going to need several whites for the hen, goose, and swan, so I loaded up on some fun patterns that might be reminiscent of feathers.  This white was one of them.

This white-on-white fabric in this particular design screamed "French hen" to me.

The face pieces were pretty small, but they fit together nicely.  I love the mottled grey that I found for the chest feathers.  Overall, she's a pretty cheery little chicken, and I love this block as an addition to the quilt.

French hen close-up.

I know that I have had some purchases of the first block so far, and I am so grateful and excited to know that people out there are interested in quilting along with this series.  I hope you have as much fun putting your blocks together as I have.  Don't forget to share your progress with me!  I'd love to see your pictures.

Friday, September 9, 2016

12 Days of Christmas Block of the Week Quilt-Along: Blocks 1 and 2

I am so pleased to announce that the 12 Days of Christmas Block of the Week quilt-along has begun!  And we're starting off with not one pattern, but two for good measure.  I have the partridge in a pear tree and the turtle dove blocks to release today, and each following Friday I will release the next pattern in the lineup.  If you keep up with the patterns, this quilt will be assembled and ready for quilting around Thanksgiving, giving you plenty of time to put it up for your holiday display.

12 Days of Christmas Quilt
Block 1:  Partridge in a Pear Tree.  Computer-generated image.

12 Days of Christmas Quilt
Block 2:  Turtle Dove.  Computer-generated image.

Designing this quilt-along was a tremendous feat for me because I ran into multiple technical and mechanical errors that I had to surmount, and I am really pleased with how it has all turned out.  Ironically, I'm not a big fan of feathered demon spawn birds, and I forgot how many of them are in the song until I started designing.  (When you're ready to pop on the Christmas songs again, check Natalie Cole's version of The 12 Days of Christmas for a bit of related humor.)  That means that you will have access to lots of bird blocks.  But the beautiful thing about these blocks is that you can purchase and use them individually in a variety of quilts, so they are very versatile.

Some notes about this quilt-along:

  • These patterns do not include instructions in paper piecing!  I assume that you already are familiar with the technique.  If you are not, there are numerous tutorials available online.
  • You may make items to resell as you like with these patterns, but please do not share or sell the pattern itself, in whole or in part.
  • The amount of fabric suggested on the Craftsy page is a very rough estimate.  Every piecer uses a different system of cutting and therefore a different amount of fabric.  I have tried to be extremely generous so you do not run out of fabric.
  • Make sure your printer is set to 100% scaling or no scaling to ensure your block will be 9" finished.
  • The patterns are not in color, but they do include a key to let you know what color goes in every space.  I recommend using colored pencils to color the pattern in so your finished block is accurate.
  • The section key is written up as if you are looking at the block from the front.  If you are assembling the sections while looking at the back, the pieces will look reversed.
  • While these patterns have been tested, it is entirely possible that a mistake may have occurred.  If you find a mistake, please email me!  I will correct it and send out the correct pattern as soon as possible.

These are my finished blocks.  The partridge in a pear tree started off in different colors, but I had a disaster when I was finishing up the block and the dye from my fabric bled, ruining the block.  I will share a bit about that in another posting.  The silver lining is that I adore the new color choices and I think I will be happier with my quilt overall.  I will be adding a little French dot of black for the eye before assembling my quilt.

12 Days of Christmas Quilt
Finished partridge block.


12 Days of Christmas Quilt
Partridge block close-up.

I am really tickled with how this block turned out.  There are not actually many sections that need to line up perfectly, so while it has a large number of sections, it is not actually that difficult to piece.  Just take your time and work carefully.
12 Days of Christmas Quilt
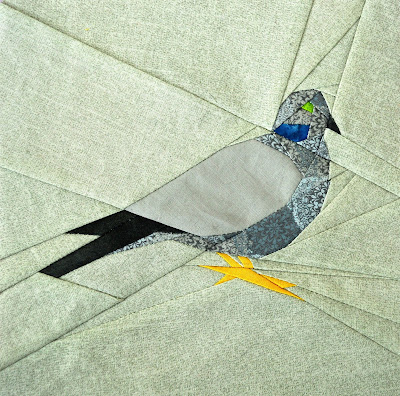
Finished turtle dove block.

To be quite honest, the turtle dove block would work if you ever needed a pigeon block for some reason, as they are very similar-looking birds.  He comes together fairly easily and I would probably call this a pattern of average difficulty.  I can see that my feet are off just a hair, but this is a sample block and I will be remaking it.  I was putting this block together when I realized my printer was scaling it without notifying me and it ended up at 7".  I may quilt this up as a tiny quilt and have it as a sample of my work at my craft booths.

Turtle dove close-up.

I love the blue batik on the throat.  A pop of bright color there is a lot of fun.

The blocks are 2$ each, and are available in my Craftsy shop.  Blocks will range from amateur to expert, so if you are nervous about starting with the first block, you might wait for an easier one to come out and start with one of those.  I will not be releasing an official quilt layout for these blocks because I am just sewing mine up with basic sashing between, but I will share my measurements and results with you at the end of the quilt-along.

If you sew up any of the blocks for this quilt, I would love to have you post pictures to my Craftsy page, send them to my email so I can share them here, or shoot me your blog posting so I can feature it.

Happy Christmas crafting!

Tuesday, September 17, 2013

Pattern for sale: Candy corn!

While all my fandom patterns are free, I will occasionally list a pattern for sale on Craftsy.  Every once in a while I need to try to earn a few dollars off my crafting so I can support my fabric habit family.

With the stores having reminded us for the last two months that Halloween is on its way, I thought it would be fun to put up a little Halloween piece.  You should have plenty of time to make one for yourself and a couple as gifts for friends and family.
I decided to make a pattern based on one of my favorite Halloween candies:  candy corn.  Candy corn is a running joke in my family, where the rivalry between “love it” and “hate it” is as fierce as that between any rival football teams.  The block measures 15” square and is intended as a mini quilt or a single quilt block.  This would resize easily to 30” for a nice wall hanging.  However, if these sizes are too large for you, there is also a 7” template included with the pattern.  The 7” size would function really well as a mug rug.
 
The computer-generated image.
I made mine as a 15" mini quilt to use as part of a Halloween tablescape.
 
The finished quilt.
This is about as beginner of a piece as you can get, so even those who are new to paper piecing should have little to no trouble with it.  There are no tricky angles, which I still hate and get wrong occasionally, even after a year of paper piecing.  It is all one section, so there is no joining sections together at the end.  If you stitch on the lines, everything will look exactly like it is supposed to!  The only problem I can really foresee people having is paper piecing with such large pieces of fabric.  However, the brilliant thing about doing larger patterns with big pieces is that you can pin them a lot easier without running the risk of hitting the pins with your machine.  I recommend pinning them to keep them in place while you sew, even if you don't normally on smaller patterns.

I had fun picking out some nice tonals for the candy corn and background.  I tend to work primarily in tonals and use patterns only when I need them to help get part of the paper pieced "picture" across.  Here are my main colors:

And I went with a bit crazier fabric for the backing, because that’s the perfect spot to do that.

There was not much to choose from in terms of Halloween fabrics.  I wish someone would come up with some really cute ones. So many of them were very dated.  I chose this because it is candy corn pennants so it matched the theme, and I thought the purple would go with the black nicely.
Two of my fabrics that I chose, the white and the yellow, happened to be very thin and light-colored.  That is often the case when you use fabrics from the big box stores instead of buying really nice quilting fabric.  My solution for that, especially when there is not a lot of intricate piecing, is simply to cut a piece twice the size I need and double it up.  It adds very little bulk to the piece and keeps those seams from showing through.
In retrospect, I probably would have made the binding a solid color, like a dark purple, because it looks like it is slightly off with the wavy pennants.  On my next one, I will use a different binding.  This was my first time free-motion quilting a stipple-type design over a whole mini quilt.  I normally stitch in the ditch and have only ever FMQed to add a little interest in small spots.  It was a little intimidating!  But I chose one of the easier patterns from Leah Day’s Free Motion Quilting Project.  The pattern I used is Spiral Knots.  I like this pattern because it is simple, there is room for error, and it has a fun, swirly design that is perfect for Halloween.  It made me think of a crazy spider web.  It is a really good beginner quilting design.  At this point, I haven’t quilted the candy corn, which almost makes it puff out in a sort of 3D effect.  I am not sure if I will go back and quilt that eventually or not.  I think if I did, I would echo quilt or just do wavy lines going up the length of it.  I am really on the fence about that, though, because of the three different colors.  If I do quilt it, I will probably go with monofilament thread.

You can keep your candy corn traditional, as mine is here, or go crazy with the colors.  For only 2$, this is definitely a pattern worth adding to your collection.  You can purchase it on Craftsy here.