Tuesday, October 22, 2013

Recipe: Chocolate pumpkin muffins (and an adorable apron!)

Frankly, this doesn't even qualify as a recipe.  It's more of a trick, and it's a common one at that.  But I thought I would share it with you in case you hadn't heard of this or wanted to try some of our tips.

JoAnn had these spider cupcake holders for 60% off.  Guess who couldn't resist?

My son fancies himself a chef, and spends half his day pretending to cook things like handfuls of grass ("Salad!") that inevitably ends up inside my vacuum cleaner in a huge clog.  He wants to help with every meal, and then he will continue to cut and mix food on his plate before he eats it, making it into shapes like "pizza!"  I honestly feel like he could end up on a reality cooking shows years from now and be that person who says, "I've known I wanted to be a chef since I was three!"  Lately he has been pulling out things like the Cuisinart and the Kitchenaid, plugging them in, and trying to turn them on, so I have to rethink my placement of all dangerous appliances.  (I dedicate all my current silver hairs to him.)  I figure the easiest way to keep him out of trouble is to let him help me make some things, so we started with these chocolate pumpkin muffins.  Or cupcakes.  They're sort of a mix of both, with a dense but moist texture.  Cuppins, perhaps?

Chocolate Pumpkin Muffins
Tastiest arachnids ever.

Chocolate Pumpkin Muffin Ingredients
The ingredients.  (We sometimes scavenge
for Boxtops when we are close to
turning them in, which explains the
massacred cake mix box.)
These are so simple to make.  You need a box of cake mix, which tends to go on massive sale this time of year, and a 15-oz. can of pumpkin.  That's it.  Mix the two things together well and bake according to package directions.  You can make this is a bread loaf or muffins.  If you are anti-boxed mixes, just use your favorite cake recipe and substitute all wet ingredients for the pumpkin.  I usually like homemade, but especially with my little chef, sometimes quick and simple is the way I want to go.  You can use any kind of cake mix for this.  I have found that white or yellow tend to make gag-you-sweet cupcakes, and spice cake makes it feel very holiday.  I like the chocolate because it stands up to the pumpkin really well. Plus, chocolate is magic.

This is a very thick batter, so they will basically cook up in whatever shape you drop them in, not nice and round like cupcakes.  If that bothers you, you can use a clean finger or a spoon to round them out a bit before cooking.  We finished ours off with a chocolate hazelnut spread.  We mixed canned frosting with some Nutella to add a bit of hazelnut flavor.  You can put as much or as little Nutella as you like; we went about half and half.  We then toasted chopped hazelnuts and sprinkled them on top.  Actually, you don't see the hazelnuts in the ingredients photo because they were a last-minute decision.  I am usually anti-nuts in desserts, but it helps to add something to the texture of these.

My little chef wanted to frost and top these himself.  If you know me at all, you know how difficult it was for me to give up control and hand him the frosting and spatula.  He did a great job, though!

Because my little guy is such a fan of cooking, I went ahead and made him an apron and chef's hat for Christmas like I made his sisters last year.  I used the free(!) PDF tutorial by Joanna over at Stardust Shoes and available from the Michael Miller Fabrics blog.  I can't recommend the tutorial enough; it doesn't use a ton of fabric or accessories, is very easy to make even for beginners, and comes out super cute.  I make these as gifts quite often, and they are great for boys and girls.  When we were at the fabric store, I asked him which fabric was his favorite, and he picked out these monsters.  I love it when the kids are young enough they don't ask questions.  ;)  I needed some bright blue for a quilt backing, so I got extra as the contrast fabric.  I even got it 75% off because the fabric was damaged by a misprinted section, but you can't even tell in the final design and it actually almost made it look like a batik in that spot.
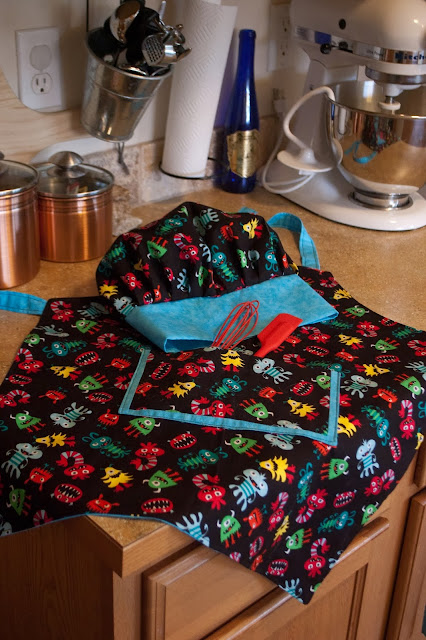
Kid's Apron and Chef's Hat
I love his monster apron, and can't wait to see if he loves it too at Christmas!

I hope you will try either the muffins, the apron, or both, and let me know how it goes!

Sunday, October 20, 2013

Free Pattern: Orange Tulips

Fandom in Stitches is currently hosting a design challenge based on John Green's book, The Fault in Our Stars.  I had never even heard of the book, but I thought I would give it a go because there is very little on FiS that I don't love, so I figured these people must have great taste.  ;)

I bought the book and, after finishing up a quilt top at 2 AM one morning, I thought I would get a few pages in to help me fall asleep.  At 6 in the morning I closed the book and sobbed myself to sleep.  I was glad to be at home alone in bed, because I was a soggy, red-eyed, sniffling mess.  Normally marring a book in any way is sacrilege to me, but my first time through I had dog-eared, tear-stained, and underlined half the pages in it.  Well worth the (pretty quick) read, in my opinion.

The computer-generated image.

I have several patterns I want to develop based on the book, but I knew I didn't have time to focus on multiple patterns right now.  So I went with one that was less of one physical thing and more of a concept.  I went for orange tulips and a revised version of a quote from the book that really spoke to me.

This was actually quite the frustrating pattern for me, because my sewing machine broke on me as soon as I had it pieced together and it took me a while and a few turns of the screwdriver to figure out the issues.  My machine sounds different now (my husband asked me to describe it and I said it was more of a whir than a clunk now, so I am guessing that's a good thing), and I have to keep the top slightly ajar to allow the bobbin winder to work, but at least it's functional.  The pattern itself goes together very easily and ends up to be a 10" block.

The finished pillow.  I didn't have any orange tulips handy, but I did happen to have some orange roses.

I did the tulips in two different colors of orange, which I don't have much of in my stash at all, and stitched the tulip stems and the scripted words in a stem stitch (a new stitch to me and my current favorite!) and the smaller text in a simple backstitch.  The background is quilted in a swirled design and I quilted veins on the leaves and a few of the petals on the tulips to add interest.  I then added about an inch and a half of dark blue sashing.

The funny thing is, after stitching the design together, I really didn't love it.  (Are designers allowed to admit that we don't always like our finished product?  Because it definitely happens to me every once in a while.)  I liked the design itself, but I wasn't happy that I chose to put it on a cream background.  For some reason, it looked dingy and yellowed and I felt it needed more life to it.  I thought I might scrap it and start over on a blue background or something, but I figured I would finish this up as a quick quilted pillow just for the design challenge.  By the time I was done quilting it, I was actually much happier.  The texture helped the piece a ton.  The quilting isn't great because I'm still having some issues with my machine, but I am reasonably happy with it.

The finished pillow.  My husband says the quote is a little sad, but it reminds me that pain needs to be felt in order to pass on.  It's like an Encouragement of my very own.  ;)

Obviously you can leave the words off this pattern and use just the tulips.  They would be perfect for a little spring quilt, especially if you reverse the pattern and have them going different ways.

The pattern is available on Craftsy and here.

Now that my machine is back on relatively solid footing, I have several projects in the works.  I have some designs I need to test out and list, I have several quilt alongs I need to make more progress on, and I have a special quilt that I'm finishing up in the next couple of days as a tester quilt for another blogger.  Plus I am working on fall recipes, Halloween costumes, Christmas gifts, and more that I will be able to share with you soon.

Tuesday, October 8, 2013

Free pattern: Embroidered devil's trap

My husband and I had so much fun at the Emerald City Comicon last year, and we are really looking forward to attending again.  I have been spending some time planning my costume for 2014.  We both want to go easy and comfortable, and we have already established that we are big Supernatural fans.  We have set my husband up with Dean's jacket and amulet, and I thought it would be fun to put on a slinky black cocktail dress and some scleral contacts and go as a crossroads demon.  (I mean, for Pete's sake, CROWLEY is going to be there!  There has to be a demon in the audience.)  I plan on embroidering a devil's trap onto a black purse to complete the look.

I went for a simplified version of the devil's trap, so it would be recognizable from a distance.  At some point, I may design a more involved one for the quilt.  It would be fun to quilt that over the entire quilt as my quilting.  Ooooh, shivers up the spine.  :)


Devil's Trap Pattern
Here, I am using the Saral transfer paper to trace my design.

To transfer the design, I used this magical thing called Saral transfer paper.  When I did my Doctor Who Stitch-Along quilt, I used a natural cream for the background, so all I had to do was use the window as a lightbox and trace the design straight on to my fabric.  But what to do about dark fabric?  I have tried using the pencils that you transfer with the iron, but you have to print your design backward and they just don't transfer well for me.  I haven't tried carbon paper, but when I was looking for a good option, I discovered the Saral transfer paper and decided to give it a try.  It is so easy to use, is mess-free, can be used multiple times, and leaves a great design behind that is easy to follow.  Much like a chalk pencil for marking sewing patterns, the design sticks around long enough to be useful, but erases very easily, if you even have to at all.  On this design, I did absolutely nothing to remove the marks, as the embroidery floss covered it.  There are also several different colors you can use for different fabrics.  Honestly, I can't recommend it enough.


Devil's Trap Transfer
I actually love the look of the chalky transfer on the black fabric.  Too bad I can't capture that permanently! 

I stitched the design using chain stitch for the pentagram and backstitch for the symbols.  It works best if you stitch the star first, as you would traditionally draw one, so that the lines cross over each other neatly.  Then stitch the circle so that the circle covers the very ends of the points of the star.  I turned my tester into a quilt block for my Supernatural quilt.  Although the block was originally intended to be 10.5" unfinished on one solid background, I felt it was missing something for a quilt.  I trimmed the block down to 8.5" and added sashing on each side to round it out to the original size.  I love the effect of the red with the black.  I did accidentally leave one small line out of one symbol, so I will be adding that in and correcting the photo when I post it to Flickr.


Devil's Trap Quilt Block
The finished product! Minus one line that I accidentally left out but will correct.  I am really going to have to work to press my embroidery hoop line out of this; Kona cotton seems to hold a crease really well.

You can download the pattern here or on Craftsy.

I have an angel tablet and/or demon tablet swimming around in my head now ...  perhaps a mix of paper piecing and embroidery?

Thursday, October 3, 2013

Free pattern: When an angel dies ...

I have been wanting to post lately, but Blogger has been giving me some real trouble.  If you notice anything wonky about the layout and photos in this posting, I offer my apologies.

If you guessed ages ago that the new free pattern is angel wings from Supernatural, you guessed correctly!  Yes, I know it is a CW show, and I realize I am 31, not 13.  But it’s still a guilty pleasure.  Ultimately, I plan on designing enough blocks that I can make a quilt.  I realize this may seem like a strange place to start, but the first time I saw the image of the angel wings burnt into concrete, I knew I needed to capture that somehow.  I had the pattern drawn out quickly, but there was some redundant piecing, and it took me a while to get around to fixing those.  But the pattern is finished and tested and ready for you to try!


Supernatural Angel Wings Quilt Block
The computer-generated image.
 The quilt block is 10” square.  I find that is a good size for doing intricate blocks, and it is easy enough to size it down to 5” for people who prefer working with smaller blocks.  I chose a feathery black for the wings, and a grey that looked a lot like wet concrete.

Supernatural Angel Wings Quilt Block
The real deal.
In some ways, this is a very tricky pattern.  There are lots of small pieces, and it wears on you to sew them after a while.  But in other ways, the pattern is not very difficult.  Once you get the rhythm of the triangles, it goes fairly quickly.  There are not too many troublesome sections to join, and there are only two colors to worry about.  The best piece of advice I can give you is to iron after every seam, and to trim your seams down to about 1/8 of an inch in the sections full of tiny pieces.  That will keep it from getting bulky.  I cannot stress the importance of ironing enough.  When I first started out, I was always tempted to skip that step, and to finger press each seam instead.  But my blocks turn out so much better and the sections join more accurately if you press each and every seam with the iron.  (And as a bonus, I find that I get my daily exercise hopping up and down from my chair to get to the ironing board during my quilting sessions!) 
 
With the size of the pieces, it was difficult to provide a pattern that was both numbered and easy to see the lines.  Therefore, I included both a numbered pattern and an unnumbered pattern in the document.  I printed out the unnumbered pages and simply wrote the numbers in myself using the key.  The one section you may have some difficulty with is Section C.  I have provided a bit of a close-up here.  If you have any paper piecing experience, you should be able to figure out the last few steps even without numbers.  Alternately, you could leave the tiny pieces of that section either black or grey, and your pattern will just look a little different in that area.  It shouldn’t be too noticeable.

Supernatural Angel Wings Quilt Block
I promise you will make it through all those tiny pieces!
When I showed my son the block, he insisted it was an owl.  While that was a bit of a blow to my designing ego, that got me thinking.  I took the block I had already designed and modified it to make him a real owl block.


Owl Quilt Block
This owl block was an unintended side trip, but I am happy I made it!
The owl will be tested and up in my Craftsy shop in the next couple of weeks, as soon as I finish Shaun the Sheep and a pile of Christmas presents.  A quilter's work is never done!  You can find the angel wings pattern on Craftsy or here.

I am currently planning my 2014 Emerald City Comicon costume, and I will be embroidering a devil’s trap on a purse, so that embroidery pattern should be along in not too long.

Which Supernatural character or symbol would you like to see next?

Thursday, September 26, 2013

Recipe: Chocolate chai fudge

When I get into mischief around here, it isn't always quilty.  Fall puts me in the mood to be in the kitchen baking, and today was the perfect day to do that.

The last two years, my girls have participated in the Creative Kids competition at the Washington State Spring Fair.  They love seeing their work on display at the fair, especially when they have been awarded ribbons.  One of our favorite contests is the Seattle Fudge Parent-Child Candy Contest.  The first year,  my eldest daughter won second place with her chocolate strawberry fudge, filled with fresh strawberries.  This year, not to be outdone, her younger sister won second place for her chocolate chai fudge.

I know this time of year many people start drooling over the pumpkin recipes, and I am no different.  But when I think of fall, I think of curling up on the couch with some needlework, a favorite show, and a chai latte.  So I thought I would whip up a batch today to send to the front desk crew at the girls' school, and share the recipe with you as well.

Chocolate Chai Fudge

Milk Chocolate Chai Fudge
 
3/4 cup salted butter
3 cups sugar
5-6 TBS powdered chai latte mix
5 oz. evaporated milk
1 tsp dark vanilla
12 oz. milk chocolate chips
7 oz. marshmallow crème

Chai Fudge Ingredients
Ingredients.

Combine sugar and evaporated milk in a heavy saucepan and mix until sugar is completely moistened.  Add butter and chai latte mix.  Bring to a boil over medium-high heat, stirring occasionally.  Boil approximately 4 minutes, stirring constantly.  Remove from heat, lowering heat on stove, then add marshmallow crème and vanilla.  Return pan to stove and stir until marshmallow crème is dissolved.  Remove from heat and add chocolate chips.  Stir until completely melted, then immediately pour into a greased 9x13 pan.  Cover with plastic wrap and cool before cutting.
 
Some tips and notes from me:
 
Chocolate Chai Fudge
Mix the sugar and evaporated milk
thoroughly before adding heat.
This can be made with milk chocolate for a sweeter flavor, as I have done here, or with semisweet or even dark chocolate for a deeper flavor.  The higher quality the chocolate, the better your fudge will turn out.  Just be aware that you may need to increase the amount of chai with a darker chocolate to be able to taste it.
 
Do not skip the step of stirring the sugar and evaporated milk.  You want to get this well mixed before you even start heating your mixture.  One of the things that will make your fudge grainy is undissolved sugar crystals.  The quicker and more effectively you get them dissolved, the better.
 
The brand of chai mix I used is Big Train, available at Cash & Carry, and I am sure many other retailers.  However, you could use any powdered mix, including a homemade mix.
 
When you bring your fudge to a boil, do not wait for it to come to a rolling boil.  Once you start seeing bubbles that are more than a simmer, it is time to start stirring.  Do not put your spoon down at this point!  You want to keep stirring the entire time so the mixture does not scorch on the bottom.  The recipe states 4 minutes, but if you see your mixture darkening and pulling away from the sides a bit at the top, it is time to remove it from the stove.

Another way to make your fudge rich and creamy is to spend some time allowing the marshmallow crème to melt down after adding it.  Once you remove the fudge from the stove and add the chocolate chips, you need to mix it up fast and get it right into the prepared pan.

We hope you enjoy the recipe!


Tuesday, September 24, 2013

Teaser: Shaun the Sheep coming soon!

We have a birthday party coming up this weekend, so I won't have much time for sewing with all the prep work I have to do.  We should be hearing about our next duty station before Christmas, and I always get antsy during this wait and start doing a massive purge and reorganization throughout the house in preparation for a move.  Normally this would be fine, but suddenly the house is a sea of items whose destiny is yet to be determined, and it just doesn't work into my party scheme.

In the meantime, my angel wings are partially finished and I hope to release the pattern early next week.  But, as you may recall, I am a serial project hopper and the designing bug hit again.  So I made myself a chai latte and gave into the dark side.

I thought I would share a little teaser with you:


Shaun the Sheep.  10" block.

I may need to search for a good grassy background for this one, and I know for sure that his eyes will be embroidered.  Expect to see Shaun released into the wild sometime in the next two weeks!  I would love to eventually design some of his friends, like Timmy, Shirley, Bitzer, the farmer, the pigs ... wow, there are actually quite a few characters that would be fun to design.

If anyone is ever interested in getting a pattern out to the masses faster, I could always use pattern testers!  Otherwise they will come out at my leisure, and I can be quite leisurely.  Drop me a line via email, or leave me a comment here!

Monday, September 23, 2013

Bigger on the inside

This year marks the 50th anniversary of Doctor Who's time on television, so for us Whovians, this is a rather big deal.  If you have not been converted to our ways yet, I suggest that you check out the modern Doctor Who episodes (starting with the ninth Doctor, which will appear to be the first episode of the series) on Netflix.  You have to promise to try at least a few episodes, because it can take a few to find your bearings and grow attached.  The classic DW episodes may be a bit difficult for some people to get in to because of the outdated technical aspects, but they are still great stories!

Naturally, there are lots of Doctor Who patterns floating around right now.  I have completed my quilt top for the Doctor Who Stitch-Along hosted by Fandom In Stitches, which I will show after it has been completed, and I have lots more wibbly wobbly, timey wimey projects in the works.

Right now, Whims and Fancies and Trillium Design, two fabulous blogs in their own right, are partnering to offer a Doctor Who Along.  At the end of the journey, there will be 20 large blocks to put toward a quilt.  What I love about their designs is that there are pieces from both the classic and modern era.  With so much on my plate, I wasn't originally planning on joining in on the fun, but then I came across some Robert Kaufman Van Gogh-inspired fabric, and it reminded me of one of my favorite episodes.  So I had to do the first block, and now I am starting on the Time Lord block, so I may as well just go ahead and do the whole quilt.  ;)

My completed TARDIS block.

I used more leftovers from my TARDIS dress and my sister's TARDIS apron to piece this.  There is an awful lot of this blue floating around in the sewing room.  I was worried the two colors would look wrong together, and when I first started piecing it, it did look totally off.  But when I pulled the whole block together, I liked the effect.  I have to say that even though the pattern is written perfectly and is very easy to do, I was piecing my entire block together when I realized that I had left the bottom row of the lighter blue off on two pieces.  I didn't want to redo them, which I should have, so I worked my way backwards, ripping out the seams as little as possible until I could work that in there.  So my whole block ended up a little wonky, but I am going to pretend it doesn't bother me and move on with my quilt.  :)

My other TARDIS-inspired project is this purse, made from the free tutorial and pattern by Sarah over at Sew What Sherlock.  I have been wanting a new purse for a long time, and I knew I wanted it to be Doctor Who themed.  But I didn't want something that all the "normal" people around town would raise their eyebrows at.  I found the TARDIS harlequin pattern at Spoonflower, and I loved the mix of a traditional print and colors with my favorite fandom.


My brand new purse.  The brilliant thing about being able to sew is that you are not limited to what the stores carry!
I had a bit of a nail biting moment when it came to choosing the lining.  I could not find a matching navy broadcloth, and that's my favorite lining to work with so I wanted to stick with it.  White was out of the question and red was a little too Fourth of July, so I finally decided to use a black.  This was a difficult decision for me because I grew up with the understanding that there are some things you just don't do.  You don't mix black and brown, you don't mix metals, you don't mix prints, and you DON'T wear navy and black together.  Of course, now all the fashion shows tell me I am outdated and all the old rules have gone out the window.  I found that hard to believe.  But once I had it all together, I actually found that I loved the black with it.  It made the bag a little more serious and made the trim pop.

I am in love with this purse.  Even though it contains both navy and black.  :)

Sarah calls this the "perfect pleated purse," and I am inclined to agree.  I love the shape, and the size is perfect for carrying my wallet, keys, phone, diapers and wipes, a book, water bottle ... whatever I need!  I made two of them (the problem with the pre-Christmas season is that I can't show half the projects I make), and it was my first time inserting a zippered pocket or magnet closure.  Both of them were a breeze, though, so I know I will use the techniques in future projects.  I was afraid the harlequin pattern would be difficult to work with, but it actually helped me line things up easier.  The lining inside the pocket even looks like a mirror image.  I did a little fussy cutting on the strap to make sure I had a row of TARDISs (TARDISES?  TARDI?  What is the plural for a TARDIS?) featured in the center.


A magnet clasp and a zippered pocket?  I got a little cocky on this bag.  ;)
I am making a little matching key fob to go with it thanks to a free tutorial I found.  But that still leaves me with a half yard of this delightful fabric.  What on Earth should I make with it?

Friday, September 20, 2013

Confessions of a project hopper (free UFO organizer)

I project hop.  A lot.  Sometimes I see those adult ADD commercials and I think, Jeez, that could be me!

I used to think I was alone in this, until I started following other quilters in their journeys.  It turns out, there are a lot of UFOs* tucked away in bins and on top of sewing tables and in the backs of closets.  I suspect every once in a while a quilter stumbles on an old UFO and realizes he or she completely forgot that project had ever been started!
My project hopping is so bad that I have had to develop a UFO list to keep me organized.


This wasn't even enough room for all my projects, and this is just for quilts!  Eep!
I realize this is something you could easily put together on your own and even customize it to fit your needs, and this is meant to be an idea to spark your own creativity.  By all means, develop your own!  If you are not a quilter, you can format it to your own type of projects.  I would love it if you could share your ideas here.  If, however, you would prefer the readymade version and would like to download a copy of this, you can find it here.  I highly recommend laminating it and using vis-à-vis markers so you can reuse it as needed.
I also love the fact that, besides keeping track of what I have left to do, I have a visual reminder that yes, I have finished some projects and made good headway on others.  It's nice to be reminded of this every once in a while.

Here it is, in action.  (I switched out some of my Christmas gifts for some of my other future projects.)  Yes, I also hang my templates and rulers on the wall for easy access.  We just pretend it's wall décor.
*If you do not understand the term UFO, you are either not a quilter, or you always finish what you start, which I find suspect.  ;)  A UFO is an UnFinished Object, and for many of us, they multiply like rabbits in the dark recesses of our sewing spaces.

Tuesday, September 17, 2013

Pattern for sale: Candy corn!

While all my fandom patterns are free, I will occasionally list a pattern for sale on Craftsy.  Every once in a while I need to try to earn a few dollars off my crafting so I can support my fabric habit family.

With the stores having reminded us for the last two months that Halloween is on its way, I thought it would be fun to put up a little Halloween piece.  You should have plenty of time to make one for yourself and a couple as gifts for friends and family.
I decided to make a pattern based on one of my favorite Halloween candies:  candy corn.  Candy corn is a running joke in my family, where the rivalry between “love it” and “hate it” is as fierce as that between any rival football teams.  The block measures 15” square and is intended as a mini quilt or a single quilt block.  This would resize easily to 30” for a nice wall hanging.  However, if these sizes are too large for you, there is also a 7” template included with the pattern.  The 7” size would function really well as a mug rug.
 
The computer-generated image.
I made mine as a 15" mini quilt to use as part of a Halloween tablescape.
 
The finished quilt.
This is about as beginner of a piece as you can get, so even those who are new to paper piecing should have little to no trouble with it.  There are no tricky angles, which I still hate and get wrong occasionally, even after a year of paper piecing.  It is all one section, so there is no joining sections together at the end.  If you stitch on the lines, everything will look exactly like it is supposed to!  The only problem I can really foresee people having is paper piecing with such large pieces of fabric.  However, the brilliant thing about doing larger patterns with big pieces is that you can pin them a lot easier without running the risk of hitting the pins with your machine.  I recommend pinning them to keep them in place while you sew, even if you don't normally on smaller patterns.

I had fun picking out some nice tonals for the candy corn and background.  I tend to work primarily in tonals and use patterns only when I need them to help get part of the paper pieced "picture" across.  Here are my main colors:

And I went with a bit crazier fabric for the backing, because that’s the perfect spot to do that.

There was not much to choose from in terms of Halloween fabrics.  I wish someone would come up with some really cute ones. So many of them were very dated.  I chose this because it is candy corn pennants so it matched the theme, and I thought the purple would go with the black nicely.
Two of my fabrics that I chose, the white and the yellow, happened to be very thin and light-colored.  That is often the case when you use fabrics from the big box stores instead of buying really nice quilting fabric.  My solution for that, especially when there is not a lot of intricate piecing, is simply to cut a piece twice the size I need and double it up.  It adds very little bulk to the piece and keeps those seams from showing through.
In retrospect, I probably would have made the binding a solid color, like a dark purple, because it looks like it is slightly off with the wavy pennants.  On my next one, I will use a different binding.  This was my first time free-motion quilting a stipple-type design over a whole mini quilt.  I normally stitch in the ditch and have only ever FMQed to add a little interest in small spots.  It was a little intimidating!  But I chose one of the easier patterns from Leah Day’s Free Motion Quilting Project.  The pattern I used is Spiral Knots.  I like this pattern because it is simple, there is room for error, and it has a fun, swirly design that is perfect for Halloween.  It made me think of a crazy spider web.  It is a really good beginner quilting design.  At this point, I haven’t quilted the candy corn, which almost makes it puff out in a sort of 3D effect.  I am not sure if I will go back and quilt that eventually or not.  I think if I did, I would echo quilt or just do wavy lines going up the length of it.  I am really on the fence about that, though, because of the three different colors.  If I do quilt it, I will probably go with monofilament thread.

You can keep your candy corn traditional, as mine is here, or go crazy with the colors.  For only 2$, this is definitely a pattern worth adding to your collection.  You can purchase it on Craftsy here.

Sunday, September 15, 2013

Teaser: New pattern coming soon!

I had planned a great day at Northwest Trek with the kiddos, and then I woke up to the sound of the heavens splitting open and dumping buckets of rain.  A little drizzle we can stomach, but a full lightning storm was out of the question.  And with one kid having a head cold and the other two starting to feel stuffy, it felt like a good day to stay in our pajamas, watch movies, and pop popcorn.

And when I got tired of that, it was time to design a new block!


My newest pattern.

I am hoping to test this pattern out tonight, but honestly, it will probably take me a few days to get around to it.  I do have the perfect fabrics picked out, though.

Can you guess what it is and what fandom it represents?

If you are interested in helping to test out any of my new patterns, please contact me or leave a comment.  I would love to send you my untested patterns for you to give them a trial run!


Cluck, Cluck, Sew petal pillow

I have been MIA the last few days because my son broke my iron, which has severely cut down on the amount of sewing I can do.  It was a blessing in disguise, though, because when I bought the iron I didn't realize it was a cheap Chinese-made model (I guess I expected better from Home Depot), and it didn't even have an on-off switch.  I had to unplug it from the wall every time I wanted to turn it off, releasing a shower of sparks.  And every time I used it, the lights in the sewing room would flicker like crazy.  So I am probably much safer with my new Black&Decker iron.

As we head into autumn, I have a whole favorites bar filled with spring- and summer-inspired projects that I finally have time to get around to.  I realize they are off-season, but our weather is becoming quite dreary in the Pacific Northwest, and sunny days are going the way of the dodo and common sense.  So diving into these projects now helps me keep that cheery summer attitude going just a bit longer.

I have seen dozens of tutorials for pillows with some sort of big flower on them and have been tempted to make one, but never fully realized that dream.  I did a small mock version of one with a wool felt flower on some linen left over from a Renaissance Faire dress, and I loved it.  So when I saw this tutorial from Allison at Cluck, Cluck, Sew, it really piqued my interest.  Yes, I realize the original posting is five years old, but a pattern that works, works, and it might be time to revive it.  I mulled it over in my mind and hadn’t really committed to it until I walked past the Eco-fi felt bolts—on sale, of course—and saw my favorite non-color:  a dark grey.
This is the pillow that inspired me to do this project.  I love the cheery colors!  Photo by Allison Harris of Cluck Cluck Sew.  Used by permission.

My chosen fabric.
I had seen this cream and light grey flower fabric at the store before and I knew I wanted to use it for something, but it didn’t really fit any of the paper piecing patterns I have.  I decided it would make a great background fabric for my pillow.  You can see the grey stitching here; normally I would have used a cream, but I thought a nice contrast grey would be good, even though no one ever sees the back of a pillow.  But I know it's there.  I made the mistake of buying some really nice Sulky rayon thread, and I will never do that again.  For some reason, it just will not load properly on my bobbin.  It wasn't the bobbin winder, because I tested a cotton and a polyester thread on the same winder and they wound perfectly.  I am very happy with my choice of the dark grey felt for the flower, because I need a nice neutral that I can move from room to room when the redecorating bug hits.

Never go high-tech if you don't have to!
Sometimes the hardest part of completing projects like this is finding items that are the correct size to work as a circle template.  I had recently taken apart a broken gumball machine I bought for a dollar at a garage sale (I plan repurposing it soon as a conversation piece, so be sure to watch for a post on that), and it just so happened that one of the pieces was a 4-inch circle.  Close enough for this crafter!  My Mod Podge was a good stand-in for a 3-inch circle.  When I reached the center and needed a small circle to cover the middle of the flower, my sewing machine oil was nearby and just the right size.  I traced a dinner plate for my flower template on the front fabric.

 
This was about the point I started
questioning my commitment to this project.  :)
I was able to squeeze 24 small circles and 20 circles out of the quarter yard of felt I bought, but it wasn’t quite enough.  I had to head back to the store for another 1/8 of a yard to do the last couple of rows.  I needed more of my background fabric, too.  I don't know if the home décor fabric comes on wider bolts or if I just cut my pieces out in the wrong way, so the 19” of quilting cotton didn’t quite cut it.  I was about four inches too short.  If I had thought about how much I was going to need ahead of time, I would have known that, but I’m not really one for thinking ahead.  :)  But now I have some pretty scraps and I will have to figure out a use for them.

I started sewing on petals, and life was easy for the first few rows.  By the time I reached the center, where it got a bit thick, I was very thankful to be sewing on my great-grandmother's machine, a vintage Kenmore model 158.  The manual comes in a hideous stunning avocado green, as does the matching thread and bobbin holder.  To be honest, this is probably the best machine I will ever have.  It is a workhorse that can sew through 12 layers of thick fleece to make a rag quilt (a total mistake … I meant to buy flannel and got myself confused), is simple to use, and is cheap and easy to fix on my own.  Don’t be afraid to pick up one of these older machines for 10$ or 20$ at a garage sale as a backup; you can’t go wrong with them!

I will go into serious mourning if this thing ever kicks the bucket.

The closer I got to the center, the more I needed the pins.
The original tutorial did not call for pinning the petals.  In fact, from her photos, it appears Allison is one of those magical people who can make things line up exactly where she wants with the touch of a hand, regardless of the project type.  If I am sewing straight lines, I don't use pins.  On curves, however, I have to pin like crazy and still pray to the sewing gods that my final project will kind of sort of resemble what I was going for.

Better safe than sorry!
As a family, we are somewhat tough on fabric.  I am the master of using the slipstitch to fix ripped seams, but I would rather sew smart in the first place.  Knowing that the pillow cover will need to be removed and washed quite often, I made sure to really reinforce the seams in the back where the rectangular flaps meet the front fabric.  I went over those areas a few times with the thread.

I am really pleased with the final pillow.  The felt and the colors make it feel both homey and a little luxe at the same time.


I know I will be checking out more of Allison's pillow patterns and other fun sewing projects.  If you are more of the quilty type, she has some beautiful quilt tutorials available on her blog as well.  Please head over and check them out!