Tuesday, October 22, 2013

Recipe: Chocolate pumpkin muffins (and an adorable apron!)

Frankly, this doesn't even qualify as a recipe.  It's more of a trick, and it's a common one at that.  But I thought I would share it with you in case you hadn't heard of this or wanted to try some of our tips.

JoAnn had these spider cupcake holders for 60% off.  Guess who couldn't resist?

My son fancies himself a chef, and spends half his day pretending to cook things like handfuls of grass ("Salad!") that inevitably ends up inside my vacuum cleaner in a huge clog.  He wants to help with every meal, and then he will continue to cut and mix food on his plate before he eats it, making it into shapes like "pizza!"  I honestly feel like he could end up on a reality cooking shows years from now and be that person who says, "I've known I wanted to be a chef since I was three!"  Lately he has been pulling out things like the Cuisinart and the Kitchenaid, plugging them in, and trying to turn them on, so I have to rethink my placement of all dangerous appliances.  (I dedicate all my current silver hairs to him.)  I figure the easiest way to keep him out of trouble is to let him help me make some things, so we started with these chocolate pumpkin muffins.  Or cupcakes.  They're sort of a mix of both, with a dense but moist texture.  Cuppins, perhaps?

Chocolate Pumpkin Muffins
Tastiest arachnids ever.

Chocolate Pumpkin Muffin Ingredients
The ingredients.  (We sometimes scavenge
for Boxtops when we are close to
turning them in, which explains the
massacred cake mix box.)
These are so simple to make.  You need a box of cake mix, which tends to go on massive sale this time of year, and a 15-oz. can of pumpkin.  That's it.  Mix the two things together well and bake according to package directions.  You can make this is a bread loaf or muffins.  If you are anti-boxed mixes, just use your favorite cake recipe and substitute all wet ingredients for the pumpkin.  I usually like homemade, but especially with my little chef, sometimes quick and simple is the way I want to go.  You can use any kind of cake mix for this.  I have found that white or yellow tend to make gag-you-sweet cupcakes, and spice cake makes it feel very holiday.  I like the chocolate because it stands up to the pumpkin really well. Plus, chocolate is magic.

This is a very thick batter, so they will basically cook up in whatever shape you drop them in, not nice and round like cupcakes.  If that bothers you, you can use a clean finger or a spoon to round them out a bit before cooking.  We finished ours off with a chocolate hazelnut spread.  We mixed canned frosting with some Nutella to add a bit of hazelnut flavor.  You can put as much or as little Nutella as you like; we went about half and half.  We then toasted chopped hazelnuts and sprinkled them on top.  Actually, you don't see the hazelnuts in the ingredients photo because they were a last-minute decision.  I am usually anti-nuts in desserts, but it helps to add something to the texture of these.

My little chef wanted to frost and top these himself.  If you know me at all, you know how difficult it was for me to give up control and hand him the frosting and spatula.  He did a great job, though!

Because my little guy is such a fan of cooking, I went ahead and made him an apron and chef's hat for Christmas like I made his sisters last year.  I used the free(!) PDF tutorial by Joanna over at Stardust Shoes and available from the Michael Miller Fabrics blog.  I can't recommend the tutorial enough; it doesn't use a ton of fabric or accessories, is very easy to make even for beginners, and comes out super cute.  I make these as gifts quite often, and they are great for boys and girls.  When we were at the fabric store, I asked him which fabric was his favorite, and he picked out these monsters.  I love it when the kids are young enough they don't ask questions.  ;)  I needed some bright blue for a quilt backing, so I got extra as the contrast fabric.  I even got it 75% off because the fabric was damaged by a misprinted section, but you can't even tell in the final design and it actually almost made it look like a batik in that spot.
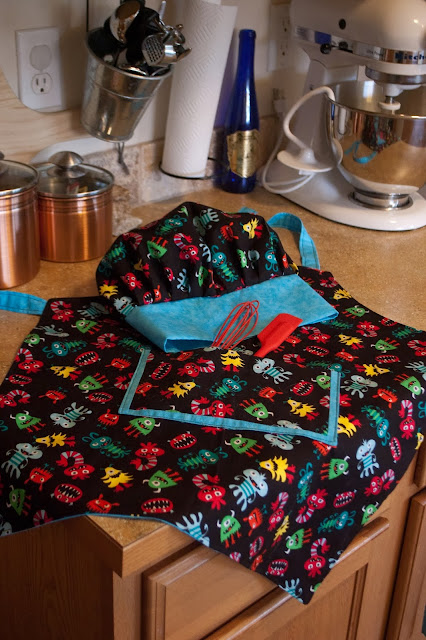
Kid's Apron and Chef's Hat
I love his monster apron, and can't wait to see if he loves it too at Christmas!

I hope you will try either the muffins, the apron, or both, and let me know how it goes!

Sunday, October 20, 2013

Free Pattern: Orange Tulips

Fandom in Stitches is currently hosting a design challenge based on John Green's book, The Fault in Our Stars.  I had never even heard of the book, but I thought I would give it a go because there is very little on FiS that I don't love, so I figured these people must have great taste.  ;)

I bought the book and, after finishing up a quilt top at 2 AM one morning, I thought I would get a few pages in to help me fall asleep.  At 6 in the morning I closed the book and sobbed myself to sleep.  I was glad to be at home alone in bed, because I was a soggy, red-eyed, sniffling mess.  Normally marring a book in any way is sacrilege to me, but my first time through I had dog-eared, tear-stained, and underlined half the pages in it.  Well worth the (pretty quick) read, in my opinion.

The computer-generated image.

I have several patterns I want to develop based on the book, but I knew I didn't have time to focus on multiple patterns right now.  So I went with one that was less of one physical thing and more of a concept.  I went for orange tulips and a revised version of a quote from the book that really spoke to me.

This was actually quite the frustrating pattern for me, because my sewing machine broke on me as soon as I had it pieced together and it took me a while and a few turns of the screwdriver to figure out the issues.  My machine sounds different now (my husband asked me to describe it and I said it was more of a whir than a clunk now, so I am guessing that's a good thing), and I have to keep the top slightly ajar to allow the bobbin winder to work, but at least it's functional.  The pattern itself goes together very easily and ends up to be a 10" block.

The finished pillow.  I didn't have any orange tulips handy, but I did happen to have some orange roses.

I did the tulips in two different colors of orange, which I don't have much of in my stash at all, and stitched the tulip stems and the scripted words in a stem stitch (a new stitch to me and my current favorite!) and the smaller text in a simple backstitch.  The background is quilted in a swirled design and I quilted veins on the leaves and a few of the petals on the tulips to add interest.  I then added about an inch and a half of dark blue sashing.

The funny thing is, after stitching the design together, I really didn't love it.  (Are designers allowed to admit that we don't always like our finished product?  Because it definitely happens to me every once in a while.)  I liked the design itself, but I wasn't happy that I chose to put it on a cream background.  For some reason, it looked dingy and yellowed and I felt it needed more life to it.  I thought I might scrap it and start over on a blue background or something, but I figured I would finish this up as a quick quilted pillow just for the design challenge.  By the time I was done quilting it, I was actually much happier.  The texture helped the piece a ton.  The quilting isn't great because I'm still having some issues with my machine, but I am reasonably happy with it.

The finished pillow.  My husband says the quote is a little sad, but it reminds me that pain needs to be felt in order to pass on.  It's like an Encouragement of my very own.  ;)

Obviously you can leave the words off this pattern and use just the tulips.  They would be perfect for a little spring quilt, especially if you reverse the pattern and have them going different ways.

The pattern is available on Craftsy and here.

Now that my machine is back on relatively solid footing, I have several projects in the works.  I have some designs I need to test out and list, I have several quilt alongs I need to make more progress on, and I have a special quilt that I'm finishing up in the next couple of days as a tester quilt for another blogger.  Plus I am working on fall recipes, Halloween costumes, Christmas gifts, and more that I will be able to share with you soon.

Tuesday, October 8, 2013

Free pattern: Embroidered devil's trap

My husband and I had so much fun at the Emerald City Comicon last year, and we are really looking forward to attending again.  I have been spending some time planning my costume for 2014.  We both want to go easy and comfortable, and we have already established that we are big Supernatural fans.  We have set my husband up with Dean's jacket and amulet, and I thought it would be fun to put on a slinky black cocktail dress and some scleral contacts and go as a crossroads demon.  (I mean, for Pete's sake, CROWLEY is going to be there!  There has to be a demon in the audience.)  I plan on embroidering a devil's trap onto a black purse to complete the look.

I went for a simplified version of the devil's trap, so it would be recognizable from a distance.  At some point, I may design a more involved one for the quilt.  It would be fun to quilt that over the entire quilt as my quilting.  Ooooh, shivers up the spine.  :)


Devil's Trap Pattern
Here, I am using the Saral transfer paper to trace my design.

To transfer the design, I used this magical thing called Saral transfer paper.  When I did my Doctor Who Stitch-Along quilt, I used a natural cream for the background, so all I had to do was use the window as a lightbox and trace the design straight on to my fabric.  But what to do about dark fabric?  I have tried using the pencils that you transfer with the iron, but you have to print your design backward and they just don't transfer well for me.  I haven't tried carbon paper, but when I was looking for a good option, I discovered the Saral transfer paper and decided to give it a try.  It is so easy to use, is mess-free, can be used multiple times, and leaves a great design behind that is easy to follow.  Much like a chalk pencil for marking sewing patterns, the design sticks around long enough to be useful, but erases very easily, if you even have to at all.  On this design, I did absolutely nothing to remove the marks, as the embroidery floss covered it.  There are also several different colors you can use for different fabrics.  Honestly, I can't recommend it enough.


Devil's Trap Transfer
I actually love the look of the chalky transfer on the black fabric.  Too bad I can't capture that permanently! 

I stitched the design using chain stitch for the pentagram and backstitch for the symbols.  It works best if you stitch the star first, as you would traditionally draw one, so that the lines cross over each other neatly.  Then stitch the circle so that the circle covers the very ends of the points of the star.  I turned my tester into a quilt block for my Supernatural quilt.  Although the block was originally intended to be 10.5" unfinished on one solid background, I felt it was missing something for a quilt.  I trimmed the block down to 8.5" and added sashing on each side to round it out to the original size.  I love the effect of the red with the black.  I did accidentally leave one small line out of one symbol, so I will be adding that in and correcting the photo when I post it to Flickr.


Devil's Trap Quilt Block
The finished product! Minus one line that I accidentally left out but will correct.  I am really going to have to work to press my embroidery hoop line out of this; Kona cotton seems to hold a crease really well.

You can download the pattern here or on Craftsy.

I have an angel tablet and/or demon tablet swimming around in my head now ...  perhaps a mix of paper piecing and embroidery?

Thursday, October 3, 2013

Free pattern: When an angel dies ...

I have been wanting to post lately, but Blogger has been giving me some real trouble.  If you notice anything wonky about the layout and photos in this posting, I offer my apologies.

If you guessed ages ago that the new free pattern is angel wings from Supernatural, you guessed correctly!  Yes, I know it is a CW show, and I realize I am 31, not 13.  But it’s still a guilty pleasure.  Ultimately, I plan on designing enough blocks that I can make a quilt.  I realize this may seem like a strange place to start, but the first time I saw the image of the angel wings burnt into concrete, I knew I needed to capture that somehow.  I had the pattern drawn out quickly, but there was some redundant piecing, and it took me a while to get around to fixing those.  But the pattern is finished and tested and ready for you to try!


Supernatural Angel Wings Quilt Block
The computer-generated image.
 The quilt block is 10” square.  I find that is a good size for doing intricate blocks, and it is easy enough to size it down to 5” for people who prefer working with smaller blocks.  I chose a feathery black for the wings, and a grey that looked a lot like wet concrete.

Supernatural Angel Wings Quilt Block
The real deal.
In some ways, this is a very tricky pattern.  There are lots of small pieces, and it wears on you to sew them after a while.  But in other ways, the pattern is not very difficult.  Once you get the rhythm of the triangles, it goes fairly quickly.  There are not too many troublesome sections to join, and there are only two colors to worry about.  The best piece of advice I can give you is to iron after every seam, and to trim your seams down to about 1/8 of an inch in the sections full of tiny pieces.  That will keep it from getting bulky.  I cannot stress the importance of ironing enough.  When I first started out, I was always tempted to skip that step, and to finger press each seam instead.  But my blocks turn out so much better and the sections join more accurately if you press each and every seam with the iron.  (And as a bonus, I find that I get my daily exercise hopping up and down from my chair to get to the ironing board during my quilting sessions!) 
 
With the size of the pieces, it was difficult to provide a pattern that was both numbered and easy to see the lines.  Therefore, I included both a numbered pattern and an unnumbered pattern in the document.  I printed out the unnumbered pages and simply wrote the numbers in myself using the key.  The one section you may have some difficulty with is Section C.  I have provided a bit of a close-up here.  If you have any paper piecing experience, you should be able to figure out the last few steps even without numbers.  Alternately, you could leave the tiny pieces of that section either black or grey, and your pattern will just look a little different in that area.  It shouldn’t be too noticeable.

Supernatural Angel Wings Quilt Block
I promise you will make it through all those tiny pieces!
When I showed my son the block, he insisted it was an owl.  While that was a bit of a blow to my designing ego, that got me thinking.  I took the block I had already designed and modified it to make him a real owl block.


Owl Quilt Block
This owl block was an unintended side trip, but I am happy I made it!
The owl will be tested and up in my Craftsy shop in the next couple of weeks, as soon as I finish Shaun the Sheep and a pile of Christmas presents.  A quilter's work is never done!  You can find the angel wings pattern on Craftsy or here.

I am currently planning my 2014 Emerald City Comicon costume, and I will be embroidering a devil’s trap on a purse, so that embroidery pattern should be along in not too long.

Which Supernatural character or symbol would you like to see next?