Showing posts with label Frozen. Show all posts

Friday, February 28, 2014

Frozen Friday: Party Time!


I had grand hopes of revealing my quilt today, but unfortunately, I was out of the house all day today and now it is too dark to take pictures.  I thought I would have the afternoon to take pictures and blog, but I had to unexpectedly go to a school assembly today to see my daughter get a character award for "Acceptance."  No better reason to miss out on a scheduled posting.  :)  I will be out of town this weekend to take part in the Hot Chocolate 5K, so I already have other blog posts written and scheduled to come out Saturday and Sunday.  Don't despair; Monday you can look forward to the pictures of the completed quilt.

But we can still have our Frozen Friday, because in lieu of that, I have pictures of our Frozen party to share!  We made a winter wonderland out of the house and had seven wild little girls invade it.  That was six days ago, and I am just starting to recover.

My birthday girl!

My little ones getting ready for the party.

Every girl took home a blueberry lollipop and one of these little "build a snowman" kits.  Just throw three large marshmallows (body), two mini marshmallows (feet), two stick pretzels (arms), five chocolate chips (eyes and buttons), and a piece of candy corn (nose) in a sandwich bag and add a topper.  This is not my unique idea, but I've seen it in so many places I wouldn't know who to credit.  I also printed up water bottle labels that said "Melted Snow" and had a picture of Olaf in summer, then taped them on water bottles.  These were a huge hit with the girls, especially when they got to add their own water flavorings.

Another huge hit was the hot cocoa bar.  I used what is normally my menu board and drew Olaf on it.  Let's just say that I have a lot more respect for Disney animators after several attempts at that.  We put out hot cocoa in different flavors, marshmallows, Andes mints, caramel, and whipped cream.  There was a run on the Keurig machine for the hot water, and soon everyone was settled in with a warm cup of cocoa.


We had plenty of purple and blue decorations.  We covered our walls with small snowflakes cut out of blue vinyl.  Sparkly snowflakes and acrylic "ice chunks" were strewn about the tables.  We strung balloons all through the downstairs using a needle and thread, which was an idea I found on Pinterest.  It worked great!  And I just happened to have PartyLite lanterns with snowflake patterns that were perfect for the party.  We even made magic color changing drinks by dropping blue food coloring into the cups, pouring ice on top, and then pouring clear pop on top.  As the pop bubbled, it turned blue.  Mini carrots served as snowman noses for a snack before gorging on pizza, and we served blue Jell-O in individual packs. Our cake had a bit of a sliding mishap because there was so much filling, but we told everyone that it had melted in the summer warmth and moved on with life.


I made the prizes for our "pin the nose on Olaf" game.  I decided to try making sugar lollipops for the first time, and I actually had a blast.  They were much easier to make than I anticipated.  We had large snowflakes and little stars.  Just a week earlier, my mom had given me some LorAnn flavorings in blueberry and mint that she didn't plan on using.  I threw a few drops of the blueberry in, and it turned out great.  Since I had extra sugar left after filling my molds, I put the rest in a pie tin and created "ice shards."


We needed plenty of activities to keep the girls busy for the entire party, so we set up a necklace-making station.  The girls picked a precut 1-inch character circle (not shockingly, every girl wanted Elsa), sealed it with an epoxy seal, glued it into a pendant back, and added a chain and an accent bead.


We also made a borax snowflake station.  Each girl created a snowflake out of a pipe cleaner, then suspended it in a jar.  The girls measured out their borax and poured it in, then I took them all to the kitchen and added boiling water.  We have been watching our snowflakes grow crystals ever since.

Everyone seemed to have a really good time at the party.  My daughter seemed to think it had everything she could have possibly wanted, so I think I'll go ahead and put this one in the "win" column.  Now it's time for me to get planning a dragon party for her big sister for June!  If you have any good ideas for that one, please let me know in the comments.  :)

My mother made this amazing gift topper for a birthday gift.  Makes me think there really might be a "crafty gene."  ;)

Monday, February 24, 2014

Frozen ... Monday (whoops): Kristoff!

The last pattern in our Frozen Friday series is finally available.  I thought about pushing myself to get it out on Friday as promised, but after a disastrous week which included my car breaking down and the family getting sick, I figured getting everything ready for the party was priority one.  I will share the pictures of the party along with the finished quilt later this week.  In the meantime, my amazing husband managed to find and fix up a laptop for me since my old one is on its last legs, so I am hoping to be able to do a lot more pattern drafting and blogging in the coming weeks.

But without further delay, here's Kristoff!

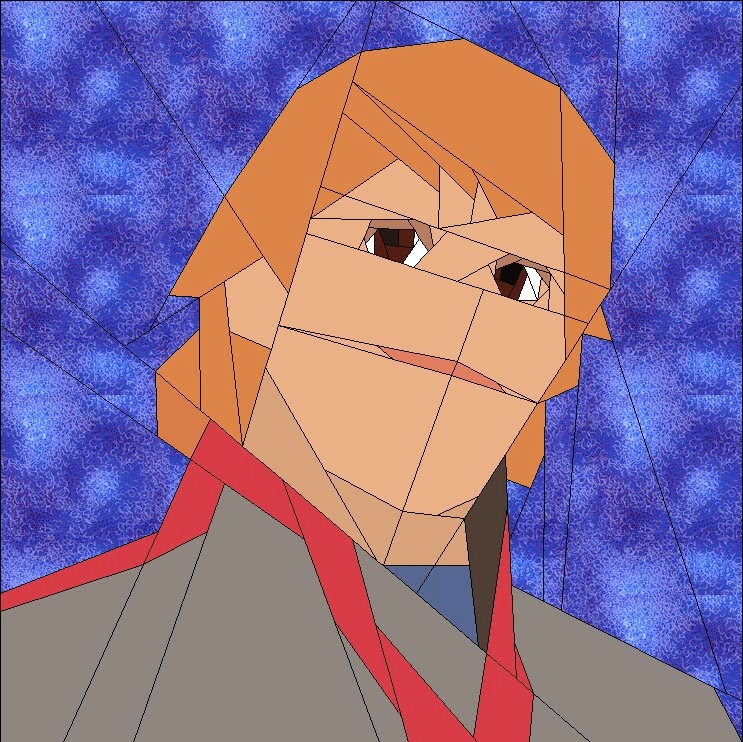
Kristoff Frozen Quilt Pattern
The computerized version. This block may require a little embroidery in the nose region to help it along.  I have to admit, the term "robotic frog" did come to mind upon drafting it.

You know the drill by now:  tiny eyes, difficult piece.  You can blow it up to make it easier.  Other than that, it's not super complicated.  As it states in the pattern, the pieces that are all background fabric above his head can be cut much larger, sewn in, and then trimmed down if it is easier than trying to trim them to the exact size ahead of time.

Kristoff Frozen Quilt Pattern
The real deal!  The neck color was an unfortunate choice, but I am working almost entirely with scraps, so I had to make do.

Please don't judge the pattern based on the mess I made of my piecing.  I tried to rush it and made all the classic mistakes: not choosing the right color fabric for the shadowing on his neck so he looks like he's wearing white face paint, stretching the eye piece too far and then trimming the end off (what was I thinking?!?!) so I had to fix it and give him a surfer hair-do, and just generally making a mess of things and not getting things lined up.  It is killing me not to go back and redo the pattern, but I had to get the quilt done and I know my daughter won't mind.

You can download the pattern for Kristoff here.  I will be posting him to Craftsy soon as well.

And another announcement. We have our giveaway winner!  Many thanks to AlidaP (you can catch her amazing blog here) for commenting on the giveaway blog post and sharing an amazing idea for a weekend project.  I actually added it to my Pinterest board so I can make it as a Christmas gift for my girls.  She made her odds unbeatable by being the only person to enter the giveaway.  I waited through Sunday to see if we had any more interest, but there was none to be had.  Hopefully we can garner some more interest in future giveaways!  I still have two quilt patterns to give away, so I am going to go through tomorrow and see who left the last two comments on the blog and contact them to see if they are interested in the remaining prizes.

Now it's off to work on my ECCC costume.  No rest for the weary.  :)

Friday, February 14, 2014

Frozen Friday: Elsa!

Don't forget to check out my last post (here) for an easy-to-enter giveaway!  It closes on Sunday, February 23.  Three prizes and only one entry so far means that your odds of winning a fun quilt pattern and rulers are great.  :)

In the meantime I am working furiously on this Frozen quilt, hoping that tomorrow I can wrap it up for the big birthday reveal.  Since I happened to have my Elsa pattern pieces already printed out from when I designed the pattern, I thought I would knock that block out.  Right now Kristoff is in a pile of finished section pieces on my sewing table, ready to be assembled.  The quilt pattern goes together very fast, so I should have plenty of time to finish it up tomorrow.

Elsa Frozen Quilt Pattern
The computer-generated image.

I am trying to do everything but the snowflake fabric with scraps from my stash, so the color choices aren't always ideal.  I am particularly low (come to find out after trying to piece my Buttercup block) on flesh tones and blonde hair tones.  The difference between her skin tone and her hair is far more noticeable in person, but Elsa has very fair skin and hair anyway.  The fabric for her dress is one I have held on to for a couple of years because I didn't love it in a large piece, but it just happened to be perfect for this particular project.

Elsa Frozen Quilt Pattern
The real deal.

I am really happy with the way this pattern came together.  Her eyes took a lot of work to paper piece, and are the primary reason you are once again looking at pattern rated at a healthy advanced level, but I refuse to lose detail just to make a pattern easier.  If I had to choose a favorite pattern from the set, which would be difficult, I think this would be the one.

Elsa is available here.  I will be uploading her to Craftsy soon.

Next week we will reveal Kristoff, and in two weeks I can show you the entire completed quilt!

Enjoy.  :)  Now go over and enter to win a quilt pattern and rulers for this:

Quilt Kit Giveaway
One grand prize winner will win the quilt kit with directions, rulers, and fish eye buttons, as well as 2/3 a yard of this orange batik, and two other winners will walk away with the quilt pattern, rulers, and fish eye buttons.

Friday, February 7, 2014

Frozen Friday: Olaf!

It really was a frozen Friday around here today!  I was glad I filled all the bird feeders yesterday because we woke up to snow and a two hour school delay.  That meant no therapy or preschool for my son, so I wasn't quite as productive as I normally am on a weekday.  (Frozen Friday almost turned into Snowy Saturday!)  I can't complain too much, though, since we don't have to make up late starts, and I know the rest of the country has really had it bad this winter.

We are continuing our Frozen patterns with Olaf, another 5" paper pieced block.  This guy was a lot of fun to piece, and seeing his big grin come together was really lifting my spirits.  I found a white fabric with tiny daisies that actually looked a little like snowflakes, so I thought that would be fun to play with.  I actually love the way it turned out.  Olaf is available here or on Craftsy (coming soon).

Olaf Frozen Quilt Block
The computer-generated image.

Olaf Frozen Quilt Block
The real deal!

Olaf, like his counterparts, is probably rated at a healthy advanced level.  I have to say, though, that it is mostly the size of the block that leads to this difficulty level.  If you are enlarging him, he should be much simpler to put together.  Because of the small pieces, I have included both a numbered and an unnumbered pattern in case you find it easier to work with the blank pattern.  I am always happy to enlarge my patterns for people and email them to you if you need help with that.  It won't be in the whole pretty pattern package, but I can send you just the enlarged pattern pieces.  Just leave a note in the comments!

Another thing I wanted to mention about these tiny patterns is the importance of accuracy.  Before I stitch two sections together, I fold one piece back along the line where I will be stitching to make sure any spots that need to match up do, and that I will have straight stitch lines on all sides when I am finished.  Sometimes if I have more than one spot that needs to match up, I will baste those spots and fold the section back to make sure they line up, then I will go back and stitch the whole line.  Once I stitch it, I take it to the iron to press the seam.  If something doesn't line up PERFECTLY, I will use the seam ripper and give it another go.  If you leave a small mistake there, little problems can multiply exponentially over the course of piecing the block together and your block can end up seriously malformed at the end, which is a lot of hard work gone to waste.  It is better to check and double-check at every step.

I can see some bits of adhesive stuck to my piece from ironing on the girls' Girl Scout patches, so it's probably time for me to clean my iron.  I usually get rid of all the gunk by mixing baking soda, some rock salt, and a tiny bit of water to make a thick paste, then take a paper towel to it and give it a little elbow grease.  My iron comes beautifully clean in no time.  If I get it in the little steam holes (I'm sure they have a more technical name than that), I just use a toothpick to pluck it out.  I never use the steam function on my iron anyway, so I don't worry about it too much.  If you are worried about it, you could probably cover them with a little tape or something to keep them clean while you scrub.

Over the next week I will be stitching Kristoff and Elsa, and hopefully retesting my revised Anna pattern.  I have to have this quilt done by next Saturday, so we are in time crunch mode!  If you give any of these patterns a try, I would love to see and here about your results and share them here on the blog.  :)


Friday, January 31, 2014

Frozen Friday: Anna!

It may be late, but it's definitely Friday.  Thank God for little miracles, like making it through this week.  :)

So I guess that makes it time to introduce our next Frozen Friday pattern:  Anna!

Frozen Anna quilt blocl
The computer-generated image.

This second block in our series is also a 5" block.  I embroidered the white streak in Anna's hair with a chain stitch, as well as a couple of small nostrils.  You can embroider as much or as little as you like to add details to the pattern.  I simply free-handed it.

Frozen Anna quilt block
The real deal!

I will wait to post the pattern to Craftsy until I have officially tested the redesigned block.  If you would like to download the pattern now, however, you can find it here.

The difficulty rating on this is really based on what you find difficult.  If you find teeny tiny pieces difficult, then this would be rated at a very advanced level.  The eye pieces are the only place where that will be a real issue.  I like to sew slowly, cut my seam allowances to 1/8", and even use a ruler and pencil to extend each line to make it easier to see under my presser foot.  If small pieces don't bother you at all but angles aren't your thing, this is probably more of a mid-range pattern.  It is easily blown up to a 10" block if a larger block makes the pattern easier.

This post is a little unusual, because I totally redrafted my pattern after completing my sample.  I realized after I had stitched all the pieces together and went to assemble it that the original pattern had some itty bitty Y-seams and other strange angles.  Not very easy to paper piece.  So the sample you see here is the old, more complicated version, but the pattern is the new, simplified version.  Because of that, technically you are receiving an untested pattern.  Between the two patterns, the only pieces I changed were the eyes, so it should work out just fine.  If anyone happens to test it out, please let me know and I'd be glad to feature it here!

Friday, January 24, 2014

Frozen Friday: Sven!

As promised, today is our first "Frozen Friday!"  I am really excited to be presenting my first series of blocks.  I know that other designers are working on Frozen blocks as well, but I wanted to be responsible for these start to finish for my daughter's quilt to add to the special, homemade quality.  You can probably expect another short design series this spring as well for my other daughter's birthday. We are thinking dragons, which should be a lot of fun.  Maybe something based off Eragon?

But back to Frozen.  :)  We are beginning with Sven.  Not only is he really adorable, but I wasn't quite ready to design blocks with people's faces yet.  That was a bit of a scary prospect until I actually got down to it.

Sven Frozen Quilt Block
Here's the computer-generated image ...

Here is the completed block!  (Please forgive the terrible lighting, but I had to take the photo after it was dark out.)

Sven Frozen Quilt Block
and the real deal!

The stitches are still stretched a little tight and are a bit visible because I haven't removed the paper yet.  I find that I have better luck with my stitching holding together if I wait to remove the paper until the quilt has been assembled.

The snowflake fabric is Wintersburg, by Abbott Designed (licensed to South Sea Imports), and everything else was scraps.  I actually found other snowflake fabrics that looked more like "Frozen" to me, but I didn't want them competing with the characters too much.  Maybe I will use one of those prints for the backing.  I haven't quite decided yet.

You might recall that I designed these blocks at 5" to fit into Jennifer Ofenstein's Classic Film pattern.  Because of that, this pattern can be incredibly complicated.  I don't personally find small pieces to be an issue, but I know some people do.  There aren't any strange angles that I can remember, but there are lots and lots and lots of tiny pieces.  I suggest that you blow it up to a larger size if you are intimidated.  Another option is to leave the inside of his eyes entirely white and either embroider a pupil or add a small black bead to your design.  You will, until I can convince my husband to get me EQ7, have to compare the pattern pieces to the section key and write in your own colors, but it is very manageable.

You can find the pattern free here or on Craftsy.

I do have all the other patterns (Anna, Elsa, Kristoff, and Olaf) designed, so I am looking forward to testing those over the next few weeks and releasing them to the public.  If you have a serious preference for which one is released next, be sure to let me know in the comments and I can take that into consideration.

Enjoy!